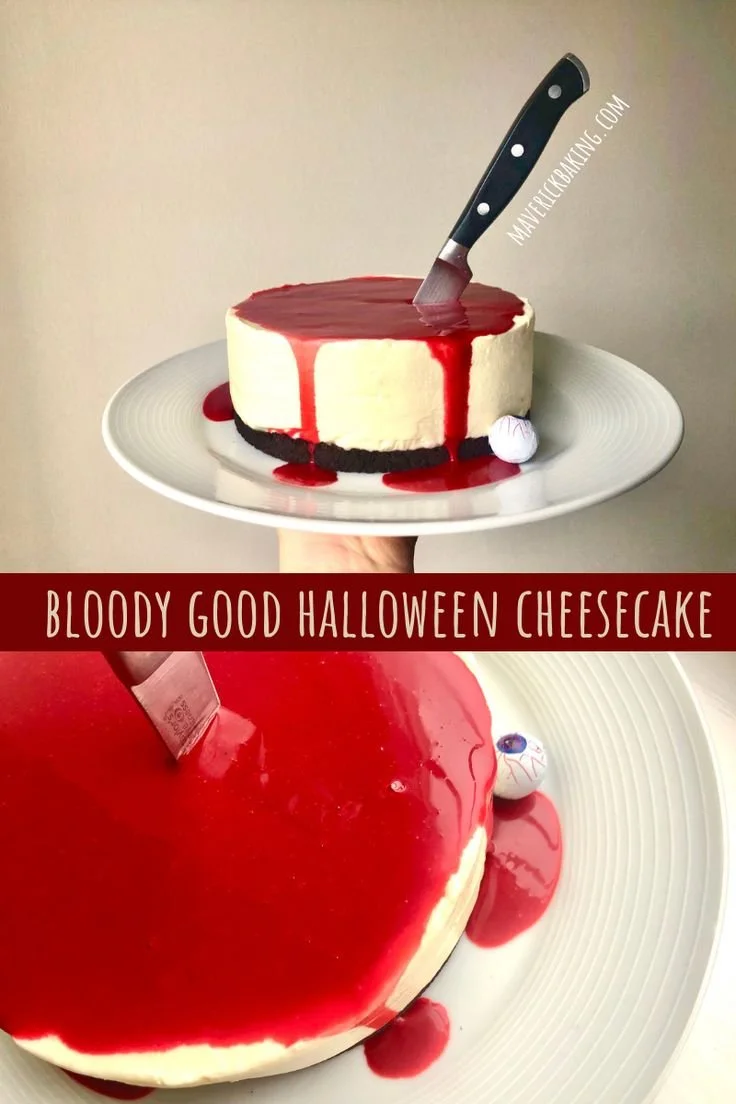
Indulge in the spirit of Halloween with this delicious Bloody Good Halloween Cheesecake. Every bite is creamy and rich, balanced by a crunchy chocolate cookie base, making it the perfect dessert for any spooky gathering. Plus, the dramatic blood drip effect not only makes it visually striking but also adds an element of fun to your Halloween festivities.
Why You’ll Love Bloody Good Halloween Cheesecake
- Eye-Catching Presentation: The striking blood drip effect makes this cheesecake a centerpiece for your Halloween table, sure to impress your guests.
- Easy to Make: With straightforward steps, even beginners can whip up this delightful cheesecake without any hassle.
- Rich and Creamy: The combination of cream cheese and white chocolate creates a luscious, smooth texture that melts in your mouth.
- Great for Gatherings: This cheesecake serves a crowd, making it perfect for parties, potlucks, or family celebrations during the spooky season.
- Versatile Flavor: While delicious on its own, this cheesecake pairs well with various toppings and accompaniments, allowing for customization based on your preferences.
Recipe Overview
- Prep Time: 30 minutes
- Cook Time: 45-50 minutes
- Total Time: 4 hours 20 minutes (including chilling)
- Servings: 8-10
- Difficulty Level: Easy
Ingredients You’ll Need for Bloody Good Halloween Cheesecake
-
For the Crust:
- 150g chocolate cookies
- 75g unsalted butter (melted)
-
For the Cheesecake Filling:
- 500g cream cheese (softened)
- 100g sugar
- 200g white chocolate (melted)
- 2 large eggs
- 1 teaspoon vanilla extract
-
For the Blood Drip Effect:
- Cocoa powder (for dusting)
- Red food coloring (for the blood drip)
- Water (to achieve desired consistency)

How to Make Bloody Good Halloween Cheesecake
-
Preheat the Oven: Preheat your oven to 325°F (160°C).
-
Prepare the Crust: Crush the chocolate cookies until fine crumbs form. Mix the crumbs with the melted butter until fully combined. Press this mixture firmly into the base of a springform pan, ensuring it’s even.
-
Mix the Filling: In a large mixing bowl, beat the softened cream cheese and sugar together until smooth and creamy. Gradually add the melted white chocolate, mixing continuously. Add the eggs one at a time, followed by the vanilla extract, and mix until fully incorporated.
-
Pour and Bake: Pour the cream cheese mixture over the prepared cookie crust. Level the top with a spatula. Bake in the preheated oven for 45-50 minutes, or until the center is just set but still slightly wobbly.
-
Cool and Chill: Once baked, let the cheesecake cool to room temperature. Then, refrigerate it for at least 4 hours or overnight for best results.
-
Create the Blood Drip Effect: In a small bowl, mix cocoa powder with a small amount of water and red food coloring until you reach your desired watery consistency. Drizzle this mixture over the top of the chilled cheesecake to create a blood drip effect.
Tips for Success
- Room Temperature Ingredients: Ensure your cream cheese is at room temperature for easier mixing and a smoother filling.
- Avoid Overbaking: To prevent cracks, keep an eye on the cheesecake, taking it out while it’s still a bit wobbly in the center.
- Chill Thoroughly: Allowing the cheesecake to chill well helps it set properly, ensuring perfect slices.
- Use High-Quality Chocolate: Choose a good quality white chocolate for a richer flavor in your filling.
- Drip Consistency: Adjust the cocoa and water mixture to achieve a thick consistency for the blood effect.
Easy Variations
- Chocolate Drizzle: Instead of a blood drip effect, drizzle melted chocolate on top for a sweet twist.
- Fruit Topping: Add fresh raspberries or strawberries on top for a fruity contrast to the creamy cheesecake.
- Flavor Infusion: Experiment with different extracts like almond or hazelnut for a unique flavor profile in the filling.
- Graham Cracker Crust: Substitute the chocolate cookie crust with a traditional graham cracker crust for a change in flavor.
- Halloween Sprinkles: Top the cheesecake with Halloween-themed sprinkles for a festive touch.
What to Serve with Bloody Good Halloween Cheesecake
- Whipped Cream: Lightened whipped cream complements the dense cheesecake beautifully.
- Coffee or Tea: A warm beverage pairs well, balancing the creamy sweetness of the dessert.
- Chocolate Sauce: A drizzle of chocolate sauce adds an extra layer of indulgence to each slice.
- Fresh Berries: The tartness of berries contrasts nicely with the richness of the cheesecake.
- Pumpkin Spice Cookies: These seasonal cookies can enhance the fall flavors at your gathering.
Storage and Reheating
- Refrigerator Storage: Store any leftovers in an airtight container in the refrigerator for up to 5 days.
- Freezer Storage: If you want to prepare in advance, you can freeze the cheesecake for up to 2 months. Wrap it tightly in plastic wrap and then in aluminum foil before freezing.
- Thawing: To preserve texture, thaw in the refrigerator overnight before serving.
- Best Serving Temperature: Cheesecake is best served cold, so avoid reheating it; just let it sit out for a few minutes before slicing.
Common Mistakes to Avoid
- Forgetting to Soften Cream Cheese: Cold cream cheese won’t mix well, resulting in lumps in your filling.
- Overbaking: Keeping the cheesecake in the oven too long will lead to cracks and a dry texture.
- Skipping the Chill Time: Don’t rush the chilling process; it’s crucial for proper setting and flavor development.
- Inaccurate Measurements: Use a kitchen scale to measure ingredients for best results, especially with the crust.
- Not Checking for Doneness: Use a toothpick to check the center; it should have a slight jiggle when finished baking.
Bloody Good Halloween Cheesecake: Background & Cultural Inspiration
The Bloody Good Halloween Cheesecake combines traditional cheesecake elements with a playful spirit inspired by Halloween. Cheesecake itself has roots in ancient Greece, where it was believed to be the original dessert served to athletes during the Olympic games. Over centuries, it transformed into various forms across cultures, with the modern version becoming popular in America. Incorporating Halloween motifs, such as the blood drip, adds a festive twist, embodying the playful yet spooky essence of the holiday. This cheesecake not only celebrates the fun of Halloween but also showcases how desserts can be aesthetically engaging and delicious.
Frequently Asked Questions
Can I make this cheesecake ahead of time?
Yes, it can be made up to 2 days in advance. Just be sure to store it in the refrigerator.
What can I use instead of white chocolate?
You can substitute white chocolate with melted cream cheese or a non-dairy chocolate option for a different flavor.
Is it okay to leave cheesecake out at room temperature?
Cheesecake should not be left out for more than 2 hours to maintain its quality and safety.
Can I freeze leftovers?
Yes, leftover cheesecake can be frozen for up to 2 months. Just ensure it is well-wrapped.
How can I prevent cracks in my cheesecake?
Avoid overbaking and ensure your ingredients are at room temperature before mixing to help achieve a smooth texture.
Final Thoughts
The Bloody Good Halloween Cheesecake is not only a delicious treat but also a delightful way to celebrate the Halloween season. Its creamy texture and striking appearance make it a memorable addition to any gathering. With simple steps and accessible ingredients, you’ll find joy in creating this festive dessert for friends and family. Give it a try, and let your taste buds revel in this delicious Halloween creation!
PrintBloody Good Halloween Cheesecake
Indulge in this rich and creamy Bloody Good Halloween Cheesecake, featuring a crunchy chocolate cookie base and a striking blood drip effect, perfect for Halloween gatherings.
- Prep Time: 30 minutes
- Cook Time: 50 minutes
- Total Time: 260 minutes
- Yield: 8-10 servings
- Category: Dessert
- Method: Baking
- Cuisine: American
- Diet: Vegetarian
Ingredients
- 150g chocolate cookies
- 75g unsalted butter (melted)
- 500g cream cheese (softened)
- 100g sugar
- 200g white chocolate (melted)
- 2 large eggs
- 1 teaspoon vanilla extract
- Cocoa powder (for dusting)
- Red food coloring (for the blood drip)
- Water (to achieve desired consistency)
Instructions
- Preheat your oven to 325°F (160°C).
- Prepare the crust: Crush the chocolate cookies until fine crumbs form. Mix the crumbs with the melted butter until fully combined. Press this mixture firmly into the base of a springform pan, ensuring it’s even.
- Mix the filling: In a large mixing bowl, beat the softened cream cheese and sugar together until smooth and creamy. Gradually add the melted white chocolate, mixing continuously. Add the eggs one at a time, followed by the vanilla extract, and mix until fully incorporated.
- Pour the cream cheese mixture over the prepared cookie crust. Level the top with a spatula. Bake in the preheated oven for 45-50 minutes, or until the center is just set but still slightly wobbly.
- Cool the cheesecake to room temperature. Then, refrigerate for at least 4 hours or overnight for best results.
- Create the blood drip effect: In a small bowl, mix cocoa powder with a small amount of water and red food coloring until you reach your desired watery consistency. Drizzle this mixture over the top of the chilled cheesecake to create a blood drip effect.
Notes
Ensure cream cheese is softened for easier mixing. Avoid overbaking to prevent cracks and chill thoroughly for best texture.