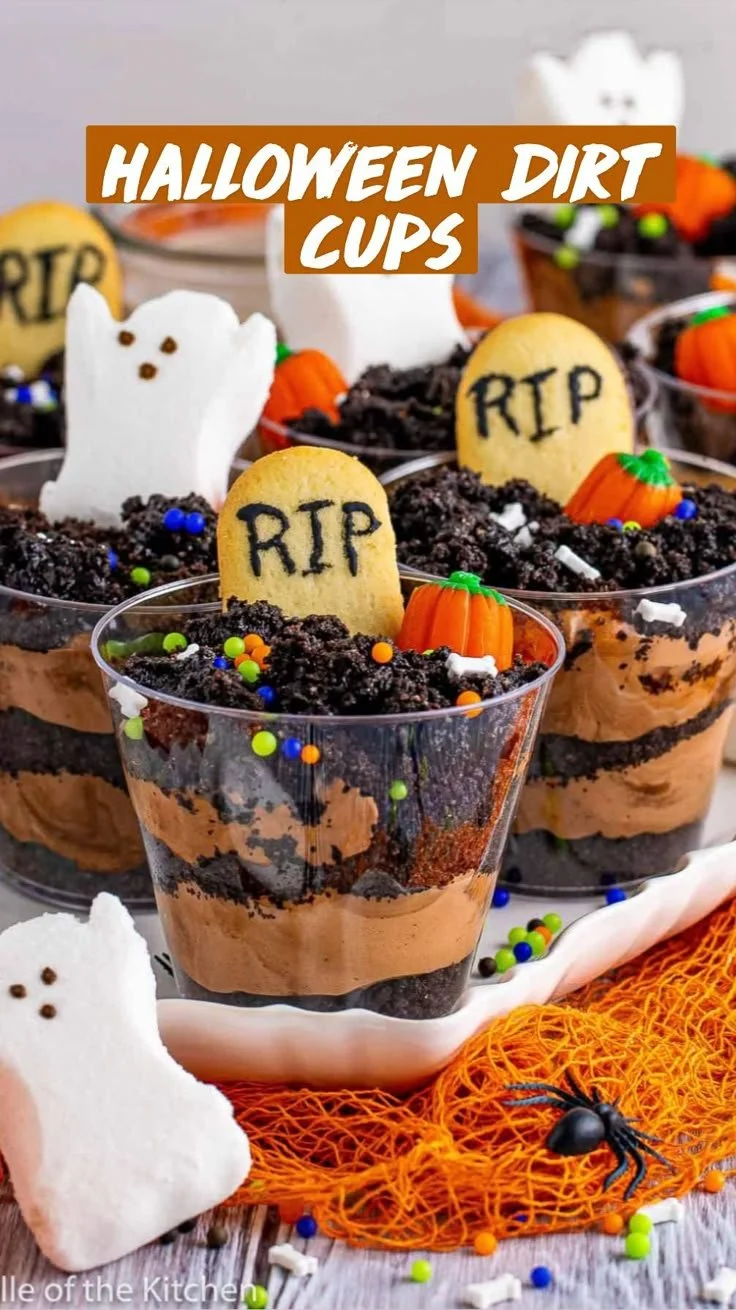
What better way to celebrate Halloween than with a delightful dessert like Halloween Dirt Cups? This fun and festive treat not only looks great but is also incredibly easy to make. Layered with creamy chocolate and crushed Oreos, these cups are sure to be a hit at any Halloween gathering.
Why You’ll Love Halloween Dirt Cups
- Easy to Assemble: With just a few simple ingredients and no baking required, these dirt cups are perfect for beginners.
- Customizable Decoration: The fun toppings allow everyone to personalize their dessert, making it interactive and exciting.
- Family-Friendly: Kids and adults alike will love digging into these delicious cups filled with chocolate goodness.
- No Special Equipment Needed: You don’t need any fancy kitchen gadgets to create this treat—just bowls and spoons!
- Perfect for Parties: These cups are great for Halloween parties or any spooky gathering, adding a festive touch to your dessert table.
Recipe Overview
- Prep Time: 20 minutes
- Cook Time: 0 minutes (no baking required)
- Total Time: 30 minutes (with chilling)
- Servings: 8
- Difficulty Level: Easy
Ingredients You’ll Need for Halloween Dirt Cups
-
For the Base:
- 2 (19-ounce) family size packages of Oreos, crushed
- 4 cups milk
- 2 (3-ounce) packages instant chocolate pudding mix
- 16 ounces frozen whipped topping, thawed
- 1 cup chocolate syrup, divided
-
For Decoration:
- Milano cookies
- Black decorator icing
- Ghost Peeps
- Pumpkin candies
- Halloween sprinkles
Enjoy the rich chocolate flavor and the delightful crunch of Oreos in this easy dessert. You can also substitute the whipped topping with a dairy-free version or use a different cookie like graham crackers for a unique twist.

How to Make Halloween Dirt Cups
-
Mix the Pudding
In a large bowl, whisk together the instant chocolate pudding mix and milk for about 2 minutes until the mixture thickens. -
Fold in Whipped Topping
Gently fold the thawed whipped topping into the pudding mixture until well combined, creating a light and fluffy texture. -
Layer the Oreos
In a trifle dish or large glass bowl, start by adding a layer of the crushed Oreos at the bottom. -
Add the Pudding Mixture
Pour a layer of the chocolate pudding mixture over the Oreos, spreading it evenly. -
Drizzle Chocolate Syrup
Drizzle some chocolate syrup on top, adding extra flavor and richness. -
Repeat the Layers
Continue layering—Oreos, then the pudding mixture, and another drizzle of chocolate syrup—until all ingredients are used, finishing with a layer of the whipped topping. -
Decorate
Get creative! Decorate the top with Milano cookies using black icing to create spooky designs, add ghost Peeps, pumpkin candies, and sprinkle Halloween-themed sprinkles all over. -
Chill Before Serving
Chill in the refrigerator for at least 30 minutes before serving to let the flavors meld and the dessert set.
Tips for Success
- Quality Ingredients: Use fresh ingredients, especially for the whipped topping and chocolate syrup, to enhance the flavor.
- Layer Neatly: For a beautiful presentation, take your time while layering. Consider using clear cups for individual servings for a lovely display.
- Chill Time: Allowing the layers to chill helps set the dessert and meld the flavors, so don’t skip this step.
- Avoid Overmixing: When folding in the whipped topping, do so gently to maintain that light texture.
Easy Variations
- Change the Base: Swap out Oreos for another type of cookie, such as chocolate chip cookies or even graham crackers for a different flavor profile.
- Dairy-Free Option: Use almond milk or coconut milk for the pudding and choose a dairy-free whipped topping.
- Flavor Twist: Add a layer of peanut butter or Nutella between the layers for a richer taste.
- Fruit Addition: Layer in banana slices or strawberries for a fresh twist to cut the sweetness.
What to Serve with Halloween Dirt Cups
- Hot Chocolate: A warm cup of hot cocoa complements the cold dessert perfectly.
- Spooky Cupcakes: Match the festive theme with decorated Halloween cupcakes.
- Fruit Salad: A light fruit salad can balance out the rich flavors of the dirt cups.
- Halloween-Themed Cookies: Offer some themed cookies as an additional sweet treat for guests.
Storage and Reheating
- Refrigerator Storage: Store any leftovers in an airtight container in the fridge for up to 3 days. It’s best enjoyed within this time for optimal freshness.
- Freezer Storage: Freezing is not recommended as it can alter the texture of the whipped topping.
- Meal Prep Note: You can prepare the layers in advance and assemble them the day of serving to save time.
Common Mistakes to Avoid
- Not Chilling Enough: Skipping the chilling step can result in a runny dessert, so ensure it’s chilled properly before serving.
- Overmixing the Pudding: Mixing too vigorously can deflate the whipped topping, making the layer dense rather than light and airy.
- Using Warm Ingredients: Make sure your whipped topping is completely thawed before using to ensure proper mixing with the pudding.
Halloween Dirt Cups: Background & Cultural Inspiration
Halloween Dirt Cups are a fun, modern twist on classic layered desserts that have been popular in many cultures. The combination of chocolate pudding and crushed cookies emulates the look of dirt in a pot, but it offers a sweet delight instead. This playful dessert incorporates elements of spooky Autumn festivities, making it a preferred choice for Halloween parties. Its roots tie back to childhood treats, where fun and whimsy in desserts create cherished memories.
Frequently Asked Questions
Can I make Halloween Dirt Cups ahead of time?
Yes, you can prepare the layers the day before and assemble them when you’re ready to serve. This can help save time on the day of your event.
What can I use instead of whipped topping?
You can substitute it with homemade whipped cream or a dairy-free topping if you have dietary preferences.
How long do leftovers last in the fridge?
Leftovers can be stored in the refrigerator for up to 3 days. The texture may change slightly, but they will still taste great.
Is there a way to make this less sweet?
You can reduce the chocolate syrup and use a less sweet pudding mix if you prefer a less sweet flavor profile.
Can I use different flavors of pudding?
Absolutely! Vanilla or cheesecake pudding can be delicious alternatives, creating a different and appealing flavor.
Final Thoughts
Halloween Dirt Cups are a delightful treat that combines fun, flavor, and ease of preparation. Perfect for gatherings or just a special Halloween-themed dessert at home, these layered cups will not only satisfy your sweet tooth but also spark joy for everyone who enjoys them. Give this recipe a try, and enjoy the festive spirit it brings to your table!
PrintHalloween Dirt Cups

A fun and festive dessert layered with creamy chocolate and crushed Oreos, perfect for Halloween gatherings.
- Prep Time: 20 minutes
- Cook Time: 0 minutes
- Total Time: 30 minutes
- Yield: 8 servings
- Category: Dessert
- Method: No Baking
- Cuisine: American
- Diet: Vegetarian
Ingredients
- 2 (19-ounce) family size packages of Oreos, crushed
- 4 cups milk
- 2 (3-ounce) packages instant chocolate pudding mix
- 16 ounces frozen whipped topping, thawed
- 1 cup chocolate syrup, divided
- Milano cookies
- Black decorator icing
- Ghost Peeps
- Pumpkin candies
- Halloween sprinkles
Instructions
- Mix the pudding: In a large bowl, whisk together the instant chocolate pudding mix and milk for about 2 minutes until the mixture thickens.
- Fold in whipped topping: Gently fold the thawed whipped topping into the pudding mixture until well combined, creating a light and fluffy texture.
- Layer the Oreos: In a trifle dish or large glass bowl, start by adding a layer of the crushed Oreos at the bottom.
- Add the pudding mixture: Pour a layer of the chocolate pudding mixture over the Oreos, spreading it evenly.
- Drizzle chocolate syrup: Drizzle some chocolate syrup on top, adding extra flavor and richness.
- Repeat the layers: Continue layering—Oreos, then the pudding mixture, and another drizzle of chocolate syrup—until all ingredients are used, finishing with a layer of the whipped topping.
- Decorate: Get creative! Decorate the top with Milano cookies using black icing to create spooky designs, add ghost Peeps, pumpkin candies, and sprinkle Halloween-themed sprinkles all over.
- Chill before serving: Chill in the refrigerator for at least 30 minutes before serving to let the flavors meld and the dessert set.
Notes
Consider using dairy-free versions of whipped topping and pudding for dietary preferences. Quality ingredients enhance the flavors.