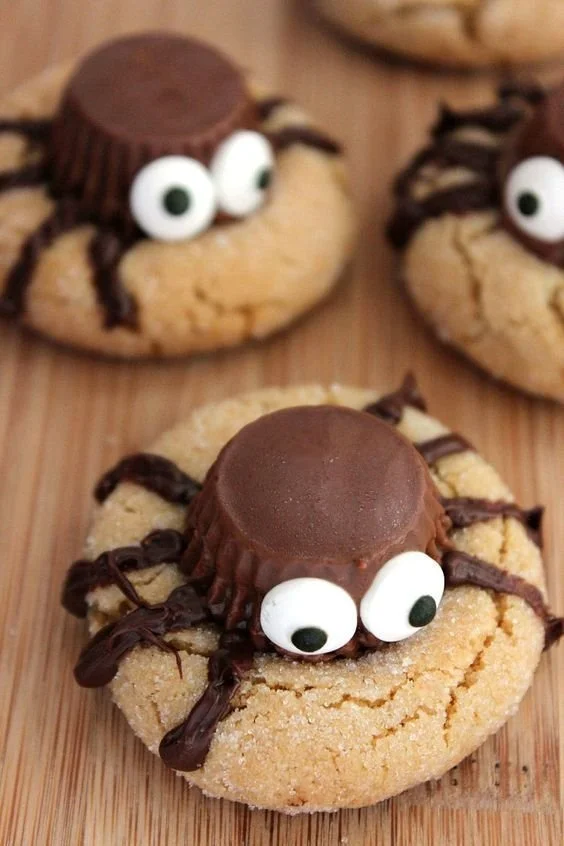
Halloween Peanut Butter Spider Cookies are the perfect treat to whip up for spooky season gatherings or school parties. With their adorable little spider designs and rich peanut butter flavor, these cookies are as fun to make as they are to eat. Plus, they’re an easy recipe that the whole family can enjoy together!
Why You’ll Love Halloween Peanut Butter Spider Cookies
- Fun Presentation: These cookies not only taste great, but they also look festive, making them perfect for Halloween-themed gatherings.
- Easy to Make: With simple ingredients and straightforward steps, this recipe is perfect for beginners, ensuring that everyone can join in on the fun.
- Rich Peanut Butter Flavor: If you love peanut butter, you’ll appreciate the delicious, nutty taste that fills each bite of these cookies.
- Customizable Toppings: You can easily switch up the toppings to make these cookies your own. Use different candies or even add a hint of chocolate.
- Great for Kids: Kids love to help with the decorating process, making it a fun family activity that brings everyone together in the kitchen.
Recipe Overview
- Prep Time: 15 minutes
- Cook Time: 10 minutes
- Total Time: 25 minutes
- Servings: 12 cookies
- Difficulty Level: Easy
Ingredients You’ll Need for Halloween Peanut Butter Spider Cookies
- 1 cup creamy peanut butter: Adds flavor and a chewy texture.
- 1 cup granulated sugar: Sweetens the dough and helps the cookies spread.
- 1 large egg: Acts as a binder to hold the ingredients together.
- ½ teaspoon baking soda: Provides a slight lift and helps cookies to puff up.
- Chocolate candies (e.g., M&Ms or chocolate chips): For the eyes of the spiders.
- Chocolate licorice or piping chocolate: To create the spider legs (adjust based on preference).

How to Make Halloween Peanut Butter Spider Cookies
- Preheat the Oven: Preheat your oven to 350°F (175°C) and line a baking sheet with parchment paper.
- Mix the Dough: In a medium bowl, combine the peanut butter, sugar, egg, and baking soda. Stir until the mixture is smooth and well incorporated.
- Form the Cookies: Using a tablespoon, scoop out small amounts of dough and roll them into balls. Place the balls about 2 inches apart on the prepared baking sheet.
- Flatten Slightly: Gently press each ball down with a fork to create a crisscross pattern on the top. This will help them bake evenly.
- Bake: Place the cookies in the preheated oven and bake for 8 to 10 minutes, or until the edges are lightly golden. The centers may look slightly underbaked, which is fine.
- Cool and Decorate: Let cookies cool on the baking sheet for a few minutes before transferring them to a wire rack. Once cooled, decorate with chocolate candies and licorice to create your spider designs.
Tips for Success
- Use Room Temperature Ingredients: Make sure your peanut butter is at room temperature for easier mixing.
- Don’t Overbake: Remove the cookies from the oven when they are just starting to set; they will firm up as they cool.
- Experiment with Toppings: Try using different colored candies to add variety to your spiders or to create a unique Halloween theme.
- Chill the Dough: If the dough feels too sticky, chill it in the refrigerator for 15-20 minutes before forming the cookies.
- Use a Silpat: For easily removable cookies, consider using a silicone baking mat instead of parchment paper.
Easy Variations
- Chocolate Peanut Butter Spider Cookies: Add ¼ cup of cocoa powder to the dough for a chocolate twist.
- Nut-Free Version: Substitute the peanut butter with sun butter or another nut-free spread to cater to allergies.
- Add Texture: Fold in some oats or chopped nuts into the dough for added crunch.
- Spooky Eyes: Use white chocolate chips for the eyes and dark chocolate for the pupils for different designs.
- Decorative Frosting: Pipe icing onto the cookies to create more elaborate designs.
What to Serve with Halloween Peanut Butter Spider Cookies
- Milk: A classic pairing, milk complements the rich peanut butter flavor beautifully.
- Pumpkin Spice Lattes: For an autumn twist, enjoy these cookies with your favorite pumpkin spice latte.
- Halloween Fruit Tray: Balance the sweetness with a platter of seasonal fruits like apples and grapes.
- Warm Apple Cider: The cozy flavors of apple cider pair perfectly with the nutty cookies for a festive touch.
Storage and Reheating
- Refrigerator Storage: Store cookies in an airtight container in the refrigerator for up to a week.
- Freezer Storage: Freeze unbaked cookie dough balls on a baking sheet, then transfer to a freezer bag for up to 3 months. Bake straight from frozen, adding a couple of extra minutes to the baking time.
- Best Reheating Method: To warm the cookies, microwave for a few seconds until just slightly warm, but be careful not to overheat, as they could become tough.
- Meal Prep Note: These cookies are excellent for making ahead of time for parties or gatherings.
Common Mistakes to Avoid
- Using Natural Peanut Butter: Avoid natural peanut butter with oil separated on top; it may alter the texture of your cookies.
- Overmixing the Dough: Mix only until the ingredients are incorporated to prevent tough cookies.
- Spacing Cookies Too Close: Make sure to allow adequate space on the baking sheet for the cookies to spread while baking.
- Baking Too Long: Keep an eye on time; cookies can quickly go from perfectly baked to overdone in minutes.
Halloween Peanut Butter Spider Cookies: Background & Cultural Inspiration
Halloween has a long tradition of bringing families together to enjoy treats, and what’s more fun than themed cookies? These Peanut Butter Spider Cookies harness the spirit of creativity associated with Halloween. The spider design adds a playful element to baking, making it an engaging activity for children and adults alike. Peanut butter treats are beloved in American culture, making these cookies not just festive but also a nostalgic favorite.
Frequently Asked Questions
Can I use crunchy peanut butter instead of creamy?
Yes, crunchy peanut butter will work; however, the cookies will have a different texture with little peanut chunks.
How long can I store these cookies?
You can store the cookies in an airtight container at room temperature for about 5 days or in the fridge for up to a week.
Can I make the dough in advance?
Absolutely! You can prepare the cookie dough in advance and refrigerate it for up to 2 days before baking.
Are these cookies suitable for freezing?
Yes, they freeze well as cookie dough or baked cookies. Just ensure they are well-wrapped to prevent freezer burn.
What if I don’t have chocolate licorice for the legs?
You can use softened chocolate frosting or pipe melted chocolate to create the legs.
Final Thoughts
Halloween Peanut Butter Spider Cookies are a delightful treat that combines creativity and flavor. They bring a joyful touch to your Halloween celebrations and are simple enough for even novice bakers to master. Whether you’re making these for a party, as a fun family activity, or as a thoughtful gift, they are sure to be a hit. Give this recipe a try and watch as everyone enjoys these charmingly spooky snacks!
PrintHalloween Peanut Butter Spider Cookies
Fun and delicious peanut butter cookies designed to resemble spiders, perfect for Halloween gatherings.
- Prep Time: 15 minutes
- Cook Time: 10 minutes
- Total Time: 25 minutes
- Yield: 12 cookies
- Category: Dessert
- Method: Baking
- Cuisine: American
- Diet: Vegetarian
Ingredients
- 1 cup creamy peanut butter
- 1 cup granulated sugar
- 1 large egg
- ½ teaspoon baking soda
- Chocolate candies (e.g., M&Ms or chocolate chips)
- Chocolate licorice or piping chocolate
Instructions
- Preheat your oven to 350°F (175°C) and line a baking sheet with parchment paper.
- Mix the peanut butter, sugar, egg, and baking soda in a medium bowl until smooth.
- Form small balls of dough and place them 2 inches apart on the baking sheet.
- Flatten each ball with a fork to create a crisscross pattern.
- Bake for 8 to 10 minutes, or until edges are lightly golden.
- Cool on the baking sheet briefly, then transfer to wire rack to decorate.
Notes
Use room temperature ingredients for easier mixing and avoid overbaking for soft cookies.